


-1000x1000.webp "1289020300 BULLDOG BX1 Gooseneck Trailer Hitch Coupler 2-5/16 inch Diameter 25000 lbs. Capacity Round")
-550x550.webp "1289020300 BULLDOG BX1 Gooseneck Trailer Hitch Coupler 2-5/16 inch Diameter 25000 lbs. Capacity Round")
Bulldog BX1 Round Gooseneck Trailer Coupler 25,000 lbs 4" Inner Tube Only Adjustable 2-5/16" Hitch Ball
Model: 1289020300 'BX1™ 25K Round Gooseneck Coupler (Inner Tube Only), Includes Locking Pin Assembly, 4 Hole Adjustment and Labels
The BULLDOG BX1 coupler is the result of generations of design expertise and field experience. It incorporates innovative features that revolutionize the benefits available from a gooseneck coupler.
• Makes hooking up, adjusting vertical height, and disconnecting easy
• Maintains smooth operation over time with grease fittings for every important operating part
• Operates easily with one hand thanks to new locking handle design
• Continuous tight ball fit - ever-increasing cam tightening mechanism
• Protects against wear with enclosed locking pin mechanism
• Resists theft with integrated feature to allow pad-locking the coupler to the ball (lock not included)
• Guides ball into socket more easily—letting you miss by more than an inch—with bottom locking plate 50% larger than competitors
• Lengthens life of locking mechanism with oil-impregnated bushings
• Allows shorter retracted length and less wasted length for trucks with high bed height via low-profile locking mechanism
• Fits ball better and reduces jarring through contour-formed edge on bottom locking plate
• Delivers unmatched strength through heavy-duty construction
• Innovations that improve security, service life, and functionality
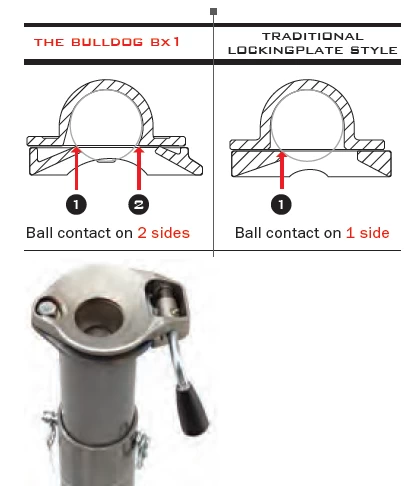
• New ball pocket design provides contact on both sides of the ball for substantially improved pull out strength - the only sliding-plate design that transfers part of the load to the top locking plate rather than only the bottom locking plate
| Part Number | 1289020300 |
| Brand | Bulldog |
| Capacity | 25,000 lbs. |
| Retracted Height | 28.5" |
| Extended Height | N/A |
| Range of Adjustment | 8" (when used w/ outer tube) |
| Ball SIze | 2-5/16" |
| Inner Tube Diameter | 4" |
| Warranty | 5 Year |
| Installation Instructions |
About Bulldog
This part is a perfect choice for your Cattle horse Livestock and other trailers made by manufacturers like Big Tex Kaufman PJ ATC Gatormade Anderson Load Trail GN WITZCO Wells Cargo Barret Red Rhino Middlebury Elite Lark Snake River Load N Go and many more
$243 99
- Best Price on Web Guarantee
- Fastest Shipping
- FREE Shipping
- Pre-Order
We match lower prices from major authorized retailers for brand-new products in original packaging, provided the item is in stock. The competing seller must be an authorized, professional retail business; offers from
individuals, auctions, peer-to-peer sites, or unauthorized sellers don’t qualify. Used, refurbished, or open-box items are excluded.
Please see our full terms for details.
$243 99
Questions? Call our Auto Experts at (877) 869-6690
Get it now, pay later
Select installments at checkout to split your purchase into 4 interest-free payments of $ every 2 weeks.
- No fees, ever.
- No impact on your credit score.
Payment options are offered by Affirm and are subject to an eligibility check and might not be available in all states. CA Residents: Loans by Affirm Loan Services, LLC are made or arranged pursuant to a California Finance Lender license.
Installments in partnership with
![]() .
Affirm and its offerings are supported in English only. Translations are not provided by Affirm.
.
Affirm and its offerings are supported in English only. Translations are not provided by Affirm.
Don't Miss the Next Restock!
We are working hard to bring this back. Join our VIP list to get an instant alert the second it is available.
Product Details
- Brand: Bulldog
- Model: 1289020300 '
- UPC: 016118112375
- Includes: Round Gooseneck Coupler
Description
BX1™ 25K Round Gooseneck Coupler (Inner Tube Only), Includes Locking Pin Assembly, 4 Hole Adjustment and Labels
The BULLDOG BX1 coupler is the result of generations of design expertise and field experience. It incorporates innovative features that revolutionize the benefits available from a gooseneck coupler.
• Makes hooking up, adjusting vertical height, and disconnecting easy
• Maintains smooth operation over time with grease fittings for every important operating part
• Operates easily with one hand thanks to new locking handle design
• Continuous tight ball fit - ever-increasing cam tightening mechanism
• Protects against wear with enclosed locking pin mechanism
• Resists theft with integrated feature to allow pad-locking the coupler to the ball (lock not included)
• Guides ball into socket more easily—letting you miss by more than an inch—with bottom locking plate 50% larger than competitors
• Lengthens life of locking mechanism with oil-impregnated bushings
• Allows shorter retracted length and less wasted length for trucks with high bed height via low-profile locking mechanism
• Fits ball better and reduces jarring through contour-formed edge on bottom locking plate
• Delivers unmatched strength through heavy-duty construction
• Innovations that improve security, service life, and functionality
• New ball pocket design provides contact on both sides of the ball for substantially improved pull out strength - the only sliding-plate design that transfers part of the load to the top locking plate rather than only the bottom locking plate
| Part Number | 1289020300 |
| Brand | Bulldog |
| Capacity | 25,000 lbs. |
| Retracted Height | 28.5" |
| Extended Height | N/A |
| Range of Adjustment | 8" (when used w/ outer tube) |
| Ball SIze | 2-5/16" |
| Inner Tube Diameter | 4" |
| Warranty | 5 Year |
| Installation Instructions |
About Bulldog
This part is a perfect choice for your Cattle horse Livestock and other trailers made by manufacturers like Big Tex Kaufman PJ ATC Gatormade Anderson Load Trail GN WITZCO Wells Cargo Barret Red Rhino Middlebury Elite Lark Snake River Load N Go and many more
Get Expert Help
Bulldog BX1 Round Gooseneck Trailer Coupler 25,000 lbs 4" Inner Tube Only Adjustable 2-5/16" Hitch Ball Install Notes
People Also Bought


