


Reese Dual Friction Sway Control Kit w/ 2 Weld On Sway Control Tabs Includes Ball Plate Hardware Ball and Sway Control Bracket
Model: 83660x2 3442x2(2) Reese Friction Sway Controls
(2) Sway Control Arms
(2) Sway Control Balls
(2) Ball Plates
(2) Sway Control Ball Mounting Bars
Installation Hardware
Installation Instructions
Friction Sway Control Features:
Friction Sway Control uses friction to resist pivotal movement and thereby works against the effects of induced sway. It operates on the principle of "stiffening" the coupling between the tow vehicle and trailer. The degree of "stiffening" or friction is adjusted to suit various trailer weights and towing conditions. Its operation is simple and uncomplicated. It doesn't prevent the generation of sway; it simply works to resist the forces once they have started.
This custom bundle is the only way to install two (2) Friction Sway Controls on your trailer and have a sway control ball on each side of your regular trailer hitch ball in the middle of your Ball Mount.
Installs and removes easily
Removes with two spring locking pins
Heavy construction for added reliability
Friction brake keeps trailer and tow vehicle stable
Quick attachment to trailer frame and ball mount
Can be used on left and right side of trailer
Sway Control Specs:
| Part Number | 83660 |
| Brand | Reese |
| Ball Shank Length | 1-1/4" |
| Ball Plate Dimensions | 6" Length 3" Height |
| Warranty | 10 Year |
| Installation Instructions |
Sway Control Ball Mounting Bar/Tab Features:
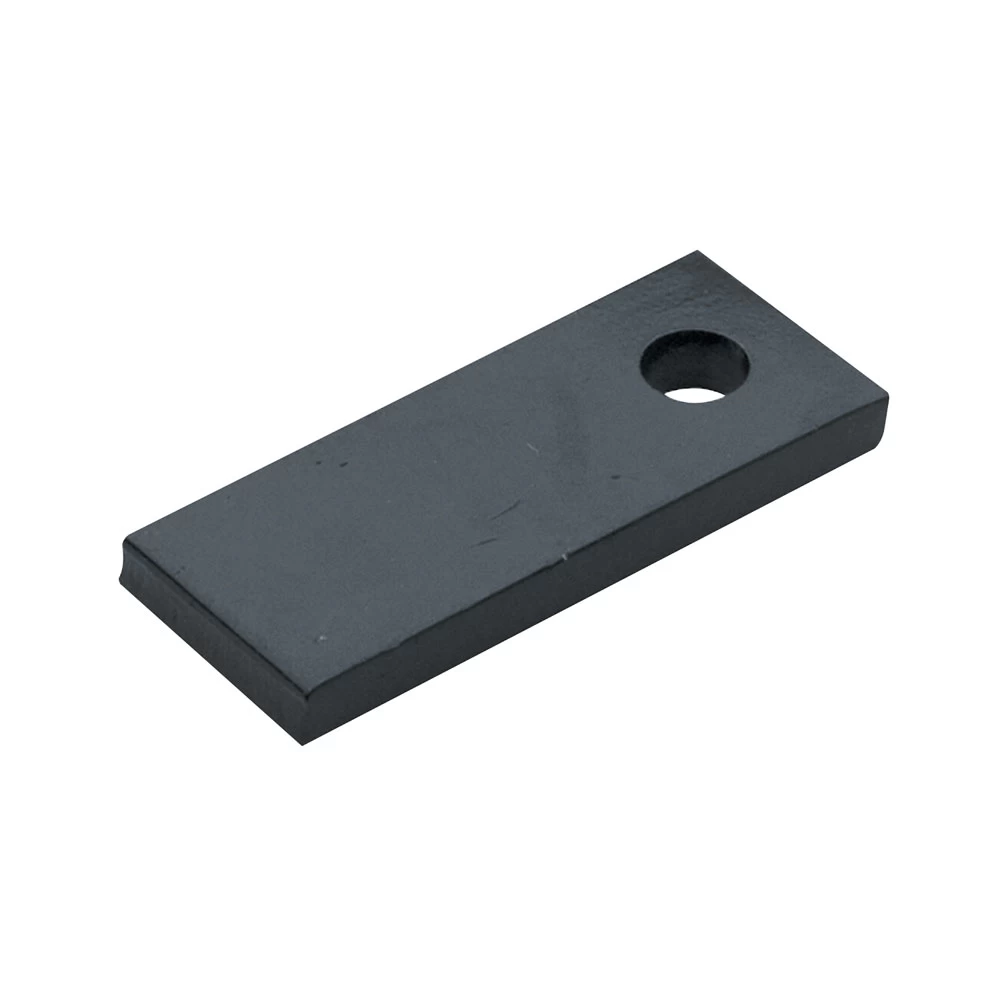
Weld On Sway Control Tab one for each side of your ballmount measures: 4-7/8" L x 1-15/16" W x 7/16 D with a 5/8" sway control ball hole. Includes 2 tabs, one per side
 X2
X2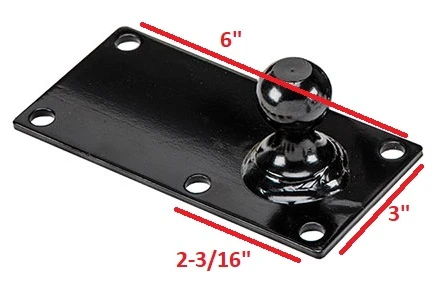 X2
X2WHY CHOOSE REESE WEIGHT DISTRIBUTION SYSTEMS?
$193 99 $195.42 1% OFF
- Best Price on Web Guarantee
- Fastest Shipping
- FREE Shipping
- Pre-Order
We match lower prices from major authorized retailers for brand-new products in original packaging, provided the item is in stock. The competing seller must be an authorized, professional retail business; offers from
individuals, auctions, peer-to-peer sites, or unauthorized sellers don’t qualify. Used, refurbished, or open-box items are excluded.
Please see our full terms for details.
$195.42 $193 99
Questions? Call our Auto Experts at (877) 869-6690
Get it now, pay later
Select installments at checkout to split your purchase into 4 interest-free payments of $ every 2 weeks.
- No fees, ever.
- No impact on your credit score.
Payment options are offered by Affirm and are subject to an eligibility check and might not be available in all states. CA Residents: Loans by Affirm Loan Services, LLC are made or arranged pursuant to a California Finance Lender license.
Installments in partnership with
![]() .
Affirm and its offerings are supported in English only. Translations are not provided by Affirm.
.
Affirm and its offerings are supported in English only. Translations are not provided by Affirm.
Don't Miss the Next Restock!
We are working hard to bring this back. Join our VIP list to get an instant alert the second it is available.
Product Details
- Brand: Reese
- Model: 83660x2 3442x2
- Includes: Dual Friction Sway Control Kit w/ Weld-On Tabs
Description
(2) Reese Friction Sway Controls
(2) Sway Control Arms
(2) Sway Control Balls
(2) Ball Plates
(2) Sway Control Ball Mounting Bars
Installation Hardware
Installation Instructions
Friction Sway Control Features:
Friction Sway Control uses friction to resist pivotal movement and thereby works against the effects of induced sway. It operates on the principle of "stiffening" the coupling between the tow vehicle and trailer. The degree of "stiffening" or friction is adjusted to suit various trailer weights and towing conditions. Its operation is simple and uncomplicated. It doesn't prevent the generation of sway; it simply works to resist the forces once they have started.
This custom bundle is the only way to install two (2) Friction Sway Controls on your trailer and have a sway control ball on each side of your regular trailer hitch ball in the middle of your Ball Mount.
Installs and removes easily
Removes with two spring locking pins
Heavy construction for added reliability
Friction brake keeps trailer and tow vehicle stable
Quick attachment to trailer frame and ball mount
Can be used on left and right side of trailer
Sway Control Specs:
| Part Number | 83660 |
| Brand | Reese |
| Ball Shank Length | 1-1/4" |
| Ball Plate Dimensions | 6" Length 3" Height |
| Warranty | 10 Year |
| Installation Instructions |
Sway Control Ball Mounting Bar/Tab Features:
Weld On Sway Control Tab one for each side of your ballmount measures: 4-7/8" L x 1-15/16" W x 7/16 D with a 5/8" sway control ball hole. Includes 2 tabs, one per side
X2X2WHY CHOOSE REESE WEIGHT DISTRIBUTION SYSTEMS?
Get Expert Help
Reese Dual Friction Sway Control Kit w/ 2 Weld On Sway Control Tabs Includes Ball Plate Hardware Ball and Sway Control Bracket Install Notes
Related Products


People Also Bought

