


Reese 6,000 Lbs Trailer Weight Distribution Hitch Kit w/ Head, Dual Cam Sway Control, Deep Drop Shank, 2-5/16" Ball, Spring Bars, Control Brackets and Lift-Assist Bar, Hardware - Reduce Sway on Travel Trailer
Model: 49911 26002High Strength Steel Head Assemnly
Dual Cam Reese Sway Control System
Preinstalled and torqued 2-5/16" ball
Tapered spring bars
Adjustable Deep Drop Shank
Control Brackets
Lift-Assist Bar
Pin/Clip
Installation Hardware
Installation Instructions
The innovative Reese Round Bar weight distribution is engineered to provide the features you expect in a weight distribution kit.
Designed to improve stability for added ride control and security
2-5/16" hitch ball - Preinstalled and torqued to proper specifications
Dual Cam Reese Sway Control System
Includes 8.5” deep drop shank – For today’s taller trucks
No-drill, clamp on brackets (fits up to 7” Trailer Frames)
High strength steel head and welded hitch bar
Tapered spring bars provide constant weight distribution over the axles for superior ride comfort
Fits bottom mount couplers
Powder Coat Finish for durability and corrosion resistance
Lifetime Warranty
| Part Number | 49912 |
| Tongue Weight Capacity | 600 lbs |
| Gross Towing Weight Capacity | 6,000 lbs |
|
Application:
|
2" Trailer Hitch Receivers rated for weight distribution |
| Max. Trailer Frame Height | 7" |
| Total height adjustment along shank | 8-1/2" |
| Installation Instructions |
REESE DUAL CAM HIGH PERFORMANCE SWAY CONTOL
This patented product is Reese Products main technique for controlling trailer sway. Unlike Friction Sway Control, this approach works to control sway from the start rather than just resisting sway once it's begun. And it works only when needed. The advantage of the Dual Cam System is its ability to forestall sway in addition to sway resistance. It works to hold down the start of swaying activity while at the same time allowing free and easy vehicle and trailer interaction. Another advantage of the Dual Cam System is that it is installed on the trailer and thereofre does not require adjustment every time the towing vehicle and trailer are hooked up, unless hitch weight or tow vehicle loading are changed.
Integrated cams into the spring bars reduce noise
No U-bolts to interfere with bottle racks or other A-Frame mounted items
Specific attachment reference points provided
Fits most applications
Improved installation times
Years of extensive field testing
Lifetime warranty
Install Instructions:
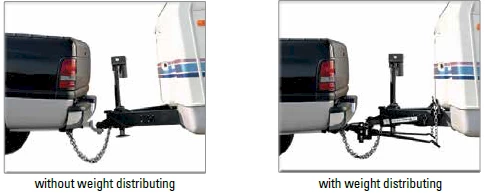
Add a weight distributing system to provide a more level ride, greater steering and brake control. The differences are in construction materials, welding, manufacturing processes and hook-up. Adjustment is simple because of the easy-to-operate snap-up brackets that allow spring bar tension to be adjusted by changing links in the support chains. Rather than merely supporting the trailer tongue weight (TW), weight-distributing hitches apply leverage between the towing vehicle and trailer causing the TW to be carried by all axles of the tow vehicle and trailer.
WHY CHOOSE REESE WEIGHT DISTRIBUTION SYSTEMS?
$772 99 $840.08 8% OFF
- Best Price on Web Guarantee
- Fastest Shipping
- FREE Shipping
- Pre-Order
We match lower prices from major authorized retailers for brand-new products in original packaging, provided the item is in stock. The competing seller must be an authorized, professional retail business; offers from
individuals, auctions, peer-to-peer sites, or unauthorized sellers don’t qualify. Used, refurbished, or open-box items are excluded.
Please see our full terms for details.
$840.08 $772 99
Questions? Call our Auto Experts at (877) 869-6690
Get it now, pay later
Select installments at checkout to split your purchase into 4 interest-free payments of $ every 2 weeks.
- No fees, ever.
- No impact on your credit score.
Payment options are offered by Affirm and are subject to an eligibility check and might not be available in all states. CA Residents: Loans by Affirm Loan Services, LLC are made or arranged pursuant to a California Finance Lender license.
Installments in partnership with
![]() .
Affirm and its offerings are supported in English only. Translations are not provided by Affirm.
.
Affirm and its offerings are supported in English only. Translations are not provided by Affirm.
Don't Miss the Next Restock!
We are working hard to bring this back. Join our VIP list to get an instant alert the second it is available.
Product Details
- Brand: Reese
- Model: 49911 26002
- Includes: 6000 lbs Weight Distribution Hitch
High Strength Steel Head Assemnly
Dual Cam Reese Sway Control System
Preinstalled and torqued 2-5/16" ball
Tapered spring bars
Adjustable Deep Drop Shank
Control Brackets
Lift-Assist Bar
Pin/Clip
Installation Hardware
Installation Instructions
The innovative Reese Round Bar weight distribution is engineered to provide the features you expect in a weight distribution kit.
Designed to improve stability for added ride control and security
2-5/16" hitch ball - Preinstalled and torqued to proper specifications
Dual Cam Reese Sway Control System
Includes 8.5” deep drop shank – For today’s taller trucks
No-drill, clamp on brackets (fits up to 7” Trailer Frames)
High strength steel head and welded hitch bar
Tapered spring bars provide constant weight distribution over the axles for superior ride comfort
Fits bottom mount couplers
Powder Coat Finish for durability and corrosion resistance
Lifetime Warranty
| Part Number | 49912 |
| Tongue Weight Capacity | 600 lbs |
| Gross Towing Weight Capacity | 6,000 lbs |
|
Application:
|
2" Trailer Hitch Receivers rated for weight distribution |
| Max. Trailer Frame Height | 7" |
| Total height adjustment along shank | 8-1/2" |
| Installation Instructions |
REESE DUAL CAM HIGH PERFORMANCE SWAY CONTOL
This patented product is Reese Products main technique for controlling trailer sway. Unlike Friction Sway Control, this approach works to control sway from the start rather than just resisting sway once it's begun. And it works only when needed. The advantage of the Dual Cam System is its ability to forestall sway in addition to sway resistance. It works to hold down the start of swaying activity while at the same time allowing free and easy vehicle and trailer interaction. Another advantage of the Dual Cam System is that it is installed on the trailer and thereofre does not require adjustment every time the towing vehicle and trailer are hooked up, unless hitch weight or tow vehicle loading are changed.
Integrated cams into the spring bars reduce noise
No U-bolts to interfere with bottle racks or other A-Frame mounted items
Specific attachment reference points provided
Fits most applications
Improved installation times
Years of extensive field testing
Lifetime warranty
Install Instructions:
Add a weight distributing system to provide a more level ride, greater steering and brake control. The differences are in construction materials, welding, manufacturing processes and hook-up. Adjustment is simple because of the easy-to-operate snap-up brackets that allow spring bar tension to be adjusted by changing links in the support chains. Rather than merely supporting the trailer tongue weight (TW), weight-distributing hitches apply leverage between the towing vehicle and trailer causing the TW to be carried by all axles of the tow vehicle and trailer.
WHY CHOOSE REESE WEIGHT DISTRIBUTION SYSTEMS?
Get Expert Help
Reese 6,000 Lbs Trailer Weight Distribution Hitch Kit w/ Head, Dual Cam Sway Control, Deep Drop Shank, 2-5/16" Ball, Spring Bars, Control Brackets and Lift-Assist Bar, Hardware - Reduce Sway on Travel Trailer Install Notes
Related Products


