


Reese 12K Trailer Weight Distribution Hitch Trunnion Spring Bars Adjustable Shank w/ 2-5/16" Ball, 1,200 lbs TW, Brackets, Hardware Travel Trailer Load Equilizing Hitch
Model: 66542 63896High Strength Steel Head Assemnly
Trunnion spring bars
Adjustable Shank
Hitch Ball 2-5/16" x 1-1/4" x 2-3/4" 12,000 lbs.
Lift Brackets
Pin/Clip
Installation Hardware
Installation Instructions
REESE TRUNNION BAR HEAVY DUTY WEIGHT DISTRIBUTING COMPLETE KIT FEATURES
Reese has combined the best of the features from all of our weight distributing kits to create the High-Performance Trunnion Kit. It includes a head design with superior strength and easy adjustment.
In addition to the changes in the head, the Weight Distributing Kit includes the highest rated spring bars per class in the industry. They also feature an integrated cam for easy set up with the optional Dual Cam High-Performance Sway Control. Other features include 9-link chains for easier set up on larger trailer frames and innovative snap-up brackets designed for superior strength and durability.
Raised hitch ball platform eliminates the need for raised hitch balls
Easy-to-use serrated washers for head adjustment
Forged ball platform and spring bar mounts
Rated up to 12,000 lbs. GTW and 1,200 lbs. TW
2-5/16" Ball included
Limited lifetime warranty
| Part Number | 66542 |
| Gross Towing Weight Capacity | 12,000 lbs |
| Tongue Weight Capacity | 600 lbs to 1,200 lbs |
|
Application:
|
2" Trailer Hitch Receivers rated for weight distribution |
| Lift-bracket positioning | mount around 30" back from hitch ball |
| Max. Trailer Frame Height | Around 5-1/2" of space along trailer frame is required |
| Maximum Frame Width | Will not fit trailer frames wider than 2-1/2" |
| Total height adjustment along shank | 5-1/4" |
| Maximum Frame Width Required | Will not fit trailer frames wider than 2-1/2" |
| Installation Instructions |
Adjustable Shank Specs:
| Length | 14" from center of Ball hole to center of hitch pin hole |
| Rise | 6"-1/2" From top of hitch receiver opening |
| Drop | 1-1/4" From top of hitch receiver opening |
Hitch Ball Specs:
Part Number 63896
Brand Draw-Tite
Size 2-5/16" x 1-1/4" x 2-3/4"
Towing Capacity 12,000 lbs. GTW
Material Chrome
(Cold forged for superior strength)
Torque torgue to 450 ft. lbs
Ball Hole Diameter 1-1/4"
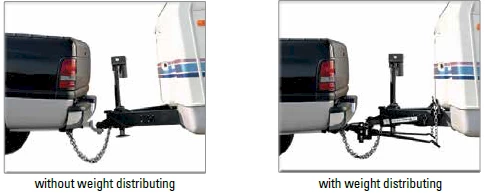
Add a weight distributing system to provide a more level ride, greater steering and brake control. The differences are in construction materials, welding, manufacturing processes and hook-up. Adjustment is simple because of the easy-to-operate snap-up brackets that allow trunnion spring bar tension to be adjusted by changing links in the support chains. Rather than merely supporting the trailer tongue weight (TW), weight-distributing hitches apply leverage between the towing vehicle and trailer causing the TW to be carried by all axles of the tow vehicle and trailer.
WHY CHOOSE REESE WEIGHT DISTRIBUTION SYSTEMS?
Optional Parts that can be added to this kit:
Bar-Style Friction Sway Control
Dual-Cam Sway Control
$979 99
- Best Price on Web Guarantee
- Fastest Shipping
- FREE Shipping
- Pre-Order
We match lower prices from major authorized retailers for brand-new products in original packaging, provided the item is in stock. The competing seller must be an authorized, professional retail business; offers from
individuals, auctions, peer-to-peer sites, or unauthorized sellers don’t qualify. Used, refurbished, or open-box items are excluded.
Please see our full terms for details.
$979 99
Questions? Call our Auto Experts at (877) 869-6690
Get it now, pay later
Select installments at checkout to split your purchase into 4 interest-free payments of $ every 2 weeks.
- No fees, ever.
- No impact on your credit score.
Payment options are offered by Affirm and are subject to an eligibility check and might not be available in all states. CA Residents: Loans by Affirm Loan Services, LLC are made or arranged pursuant to a California Finance Lender license.
Installments in partnership with
![]() .
Affirm and its offerings are supported in English only. Translations are not provided by Affirm.
.
Affirm and its offerings are supported in English only. Translations are not provided by Affirm.
Don't Miss the Next Restock!
We are working hard to bring this back. Join our VIP list to get an instant alert the second it is available.
Product Details
- Brand: Reese
- Model: 66542 63896
- Includes: 12K Weight Distribution Hitch
Description
High Strength Steel Head Assemnly
Trunnion spring bars
Adjustable Shank
Hitch Ball 2-5/16" x 1-1/4" x 2-3/4" 12,000 lbs.
Lift Brackets
Pin/Clip
Installation Hardware
Installation Instructions
REESE TRUNNION BAR HEAVY DUTY WEIGHT DISTRIBUTING COMPLETE KIT FEATURES
Reese has combined the best of the features from all of our weight distributing kits to create the High-Performance Trunnion Kit. It includes a head design with superior strength and easy adjustment.
In addition to the changes in the head, the Weight Distributing Kit includes the highest rated spring bars per class in the industry. They also feature an integrated cam for easy set up with the optional Dual Cam High-Performance Sway Control. Other features include 9-link chains for easier set up on larger trailer frames and innovative snap-up brackets designed for superior strength and durability.
Raised hitch ball platform eliminates the need for raised hitch balls
Easy-to-use serrated washers for head adjustment
Forged ball platform and spring bar mounts
Rated up to 12,000 lbs. GTW and 1,200 lbs. TW
2-5/16" Ball included
Limited lifetime warranty
| Part Number | 66542 |
| Gross Towing Weight Capacity | 12,000 lbs |
| Tongue Weight Capacity | 600 lbs to 1,200 lbs |
|
Application:
|
2" Trailer Hitch Receivers rated for weight distribution |
| Lift-bracket positioning | mount around 30" back from hitch ball |
| Max. Trailer Frame Height | Around 5-1/2" of space along trailer frame is required |
| Maximum Frame Width | Will not fit trailer frames wider than 2-1/2" |
| Total height adjustment along shank | 5-1/4" |
| Maximum Frame Width Required | Will not fit trailer frames wider than 2-1/2" |
| Installation Instructions |
Adjustable Shank Specs:
| Length | 14" from center of Ball hole to center of hitch pin hole |
| Rise | 6"-1/2" From top of hitch receiver opening |
| Drop | 1-1/4" From top of hitch receiver opening |
Hitch Ball Specs:
Part Number 63896
Brand Draw-Tite
Size 2-5/16" x 1-1/4" x 2-3/4"
Towing Capacity 12,000 lbs. GTW
Material Chrome
(Cold forged for superior strength)
Torque torgue to 450 ft. lbs
Ball Hole Diameter 1-1/4"
Add a weight distributing system to provide a more level ride, greater steering and brake control. The differences are in construction materials, welding, manufacturing processes and hook-up. Adjustment is simple because of the easy-to-operate snap-up brackets that allow trunnion spring bar tension to be adjusted by changing links in the support chains. Rather than merely supporting the trailer tongue weight (TW), weight-distributing hitches apply leverage between the towing vehicle and trailer causing the TW to be carried by all axles of the tow vehicle and trailer.
WHY CHOOSE REESE WEIGHT DISTRIBUTION SYSTEMS?
Optional Parts that can be added to this kit:
Bar-Style Friction Sway Control
Dual-Cam Sway Control
Get Expert Help
Reese 12K Trailer Weight Distribution Hitch Trunnion Spring Bars Adjustable Shank w/ 2-5/16" Ball, 1,200 lbs TW, Brackets, Hardware Travel Trailer Load Equilizing Hitch Install Notes
Related Products


