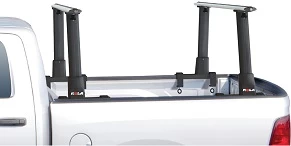
Product Details
- Brand: Rola
- Model: 59742-1
- Includes: Haul-Your-Might Truck Bed Cargo Rack
Compatibility Chart
Description
Get Expert Help
Rola Truck Bed Rack fits 00-11 Dodge Dakota 5 Foot Bed Truck Bed Ladder Rack 2 Racks Install Notes
Installation Instructions for Pick-Up-Rack™
Part Numbers:
- 59742
Tools Required:
- 17mm Socket
- 17mm Wrench
- 13mm Socket
- 1/8” Hex Key
- 5mm Hex Key
- Tape Measure
- Hack Saw
- Marking Pencil
Step-by-Step Instructions:
Step 1: Prepare the Vertical Supports
- Slide the cover over the vertical support as shown in the instructions.
- Insert the plastic cap into the top of the vertical support.
- Slide the vertical support and cover into the bed mount assembly.
- Insert two M10-1.5 x 50mm carriage bolts through the square holes in the bed mount and the vertical support.
- Add M10 lock washers and M10-1.5 hex nuts to the bolts.
- Tighten all M10 fasteners to approximately 25 Lb.-Ft. using a 17mm socket and wrench.
- Secure the cover in place using a 1/4-20 set screw and tighten with a 1/8” hex key. Avoid overtightening.
- Repeat these steps for all four vertical supports.
Step 2: Install Bed Mount Assemblies
- Clean the bed rails to remove debris and dirt.
- Place the vertical supports onto the bed rail at the desired location. The long end of the base must point toward the truck bed.
- Attach the clamps to the bed mounts and hand-tighten the wing nuts.
- Ensure that all vertical support bases are aligned front-to-back on both sides of the bed rail.
- Leave the clamps slightly loose at this step to allow for adjustments in later steps.
Step 3: Attach Crossbars
- Remove the end caps and under covers from the crossbars.
- Place the crossbars onto the vertical supports and center them from side to side.
- Align the adapter blocks and M10 T-Bolts with the flanges on the vertical supports.
- Mark the crossbar location on each side of the vertical support flange using a marking pencil.
- If necessary, use a hack saw to trim the under cover to fit the truck bed and hardware.
- Reinstall the under cover pieces in the marked positions.
Step 4: Secure the Crossbars
- Attach the crossbars to the vertical supports using:
- M10 flat washers
- M10 lock washers
- M10 hex nuts
- Tighten all M10 fasteners to approximately 38 Lb.-Ft. using a 17mm wrench.
Step 5: Attach Corner Braces
- Raise the corner brace into position and attach the top of the brace to the M8 T-Bolt in the crossbar using:
- One M8 hex nut
- One M8 lock washer
- Install an M8 button head screw and lock washer into the rivet nut in the vertical support tube.
- Tighten all M8 fasteners to approximately 25 Lb.-Ft. using a 5mm hex key.
- Repeat this process for all four corner braces.
Hardware List:
- (2x) Vertical Support Left Hand
- (2x) Vertical Support Right Hand
- (2x) Bed Mount Left Front/Right Rear
- (2x) Bed Mount Right Front/Left Rear
- (2x) Cover & 1/4-20 Set Screw (Left and Right)
- (2x) Crossbar Assembly
- (4x) Mounting Adapter
- (4x) Corner Brace
- (8x) M10-1.50 x 50mm Carriage Bolt
- (8x) M10 Lock Washer
- (16x) M10-1.50 Hex Nut
- (8x) M8-1.25 x 22mm T-Bolt
- (8x) M8 Lock Washer
- (8x) M8 Hex Nut
- (4x) M8 Button Head Screw
- (1x) 5mm Hex Key Wrench
- (1x) 1/8” Hex Key Wrench
- (8x) Plastic Cap
Safety Notes:
- WARNING: Do not exceed 800 lbs. (363 Kgs) evenly distributed load.
- WARNING: Follow the vehicle manufacturer’s weight rating for bed rail-mounted racks.
- Always secure both the front and rear of long loads to the vehicle.
- Avoid sharp turns and excessive speeds while carrying loads.
- Inspect all connections regularly to ensure tightness.
- Use only non-stretch tie-down straps for securing loads.
Specifications:
- Maximum Load Capacity: 800 lbs. (363 Kgs), evenly distributed
- Recommended Torque:
- M10 Fasteners: 38 Lb.-Ft. (52 N*m)
- M8 Fasteners: 25 Lb.-Ft. (34 N*m)
- Vehicle Compatibility: Designed for trucks without over-the-rail bed liners; minimal modification may be required for under-the-rail liners.
Installation Instructions for Pick-Up-Rack™
Part Numbers:
- 59742
Tools Required:
- 17mm Socket
- 17mm Wrench
- 13mm Socket
- 1/8” Hex Key
- 5mm Hex Key
- Tape Measure
- Hack Saw
- Marking Pencil
Step-by-Step Instructions:
Step 1: Prepare the Vertical Supports
- Slide the cover over the vertical support as shown in the instructions.
- Insert the plastic cap into the top of the vertical support.
- Slide the vertical support and cover into the bed mount assembly.
- Insert two M10-1.5 x 50mm carriage bolts through the square holes in the bed mount and vertical support.
- Add M10 lock washers and M10-1.5 hex nuts to the bolts.
- Tighten all M10 fasteners to approximately 25 Lb.-Ft. using a 17mm socket and wrench.
- Secure the cover in place using a 1/4-20 set screw and tighten with a 1/8” hex key. Avoid overtightening.
- Repeat these steps for all four vertical supports.
Step 2: Install Bed Mount Assemblies
- Clean the bed rails to remove debris and dirt.
- Place the vertical supports onto the bed rail at the desired location. The long end of the base must point toward the truck bed.
- Attach the clamps to the bed mounts and hand-tighten the wing nuts.
- Ensure all vertical support bases are aligned front-to-back on both sides of the bed rail.
- Leave the clamps slightly loose to allow for adjustments in later steps.
Step 3: Attach Crossbars
- Remove the end caps and under covers from the crossbars.
- Place the crossbars onto the vertical supports and center them from side to side.
- Align the adapter blocks and M10 T-Bolts with the flanges on the vertical supports.
- Mark the crossbar location on each side of the vertical support flange using a marking pencil.
- If necessary, use a hack saw to trim the under cover to fit the truck bed and hardware.
- Reinstall the under cover pieces in the marked positions.
Step 4: Secure the Crossbars
- Attach the crossbars to the vertical supports using:
- M10 flat washers
- M10 lock washers
- M10 hex nuts
- Tighten all M10 fasteners to approximately 38 Lb.-Ft. using a 17mm wrench.
Step 5: Attach Corner Braces
- Raise the corner brace into position and attach the top of the brace to the M8 T-Bolt in the crossbar using:
- One M8 hex nut
- One M8 lock washer
- Install an M8 button head screw and lock washer into the rivet nut in the vertical support tube.
- Tighten all M8 fasteners to approximately 25 Lb.-Ft. using a 5mm hex key.
- Repeat this process for all four corner braces.
Hardware List:
- (2x) Vertical Support Left Hand
- (2x) Vertical Support Right Hand
- (2x) Bed Mount Left Front/Right Rear
- (2x) Bed Mount Right Front/Left Rear
- (2x) Cover & 1/4-20 Set Screw (Left and Right)
- (2x) Crossbar Assembly
- (4x) Mounting Adapter
- (4x) Corner Brace
- (8x) M10-1.50 x 50mm Carriage Bolt
- (8x) M10 Lock Washer
- (16x) M10-1.50 Hex Nut
- (8x) M8-1.25 x 22mm T-Bolt
- (8x) M8 Lock Washer
- (8x) M8 Hex Nut
- (4x) M8 Button Head Screw
- (1x) 5mm Hex Key Wrench
- (1x) 1/8” Hex Key Wrench
- (8x) Plastic Cap
Safety Notes:
- WARNING: Do not exceed 800 lbs. (363 Kgs) evenly distributed load.
- WARNING: Follow the vehicle manufacturer’s weight rating for bed rail-mounted racks.
- Always secure both the front and rear of long loads to the vehicle.
- Avoid sharp turns and excessive speeds while carrying loads.
- Inspect all connections regularly to ensure tightness.
- Use only non-stretch tie-down straps for securing loads.
Specifications:
- Maximum Load Capacity: 800 lbs. (363 Kgs), evenly distributed.
- Recommended Torque:
- M10 Fasteners: 38 Lb.-Ft. (52 N*m)
- M8 Fasteners: 25 Lb.-Ft. (34 N*m)
- Vehicle Compatibility: Designed for trucks without over-the-rail bed liners; minimal modification may be required for under-the-rail liners.
Support Information:
For technical support and assistance, our team of experts is available to help. You can reach our tech support by visiting www.trailerjacks.com or calling 877-869-6690.
For complete installation instructions, including diagrams and detailed information from the manufacturer, please download the full installation PDF.